Creating a DIY Water Feature: A Step-by-Step Guide
- Mark Cisek
- Sep 18, 2024
- 4 min read
Updated: Sep 19, 2024
Overview:
Whether you’re looking to enjoy the soothing sound of trickling water or add a stylish touch to your outdoor space, a water feature is an excellent choice. For me, it served both purposes. In this guide, I’ll walk you through the process of building your own water feature, sharing both the successes and challenges I faced throughout the process to help you along the way.

Materials:
Building Your Water Feature
Before making any cuts and jumping straight into the build, make sure you come up with a plan for how you would like your water feature to look and the size you would like it to be. There are different types of spillways that can be used, so deciding which one you will be going with will determine how your water feature operates. Let's get started!
Step 1: Building Your Frame

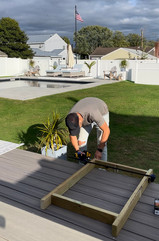


Start by planning the measurements for your water feature, considering both the space where it will be installed and the dimensions of your spillway. For my project, the final measurements were 44 inches in height, 30 inches in length, and 3.5 inches in width. As you can see from the photo on the right, there is a gap of approximately 2.75 inches at the top where the water spillway is positioned, with a cutout that will allow for the water line.
Step 2: Adding the Cement Board

Cut the cement board to match the exact measurements of your frame, and screw it to your pressure treated 2x4 frame. Use a sharp utility knife, making several passes along the same line to ensure a clean cut. Additionally, use screws specifically designed for cement board, as regular screws won’t withstand the chemical reactions over time. I used Rock-On screws for this reason. Also be careful when screwing the board to your frame not to press too hard and crumble the cement board (It helps to predrill the holes).
Step 3: Adding the Mortar

Before mixing the mortar, you want to attach a temporary raised frame to the outside of the
2x4's. This will be a guide for the depth of the mortar mix you are pouring directly onto the cement board. In this case, I used a half inch of mortar spread out across the cement board, so my temporary frame was screwed in 1/2 inch above the cement board.
When mixing the mortar, I added a charcoal cement color. This gave me that darker color I was looking for. After adding water and mixing my mortar, I poured it directly onto the cement board and spread it evenly throughout.


Step 4: Trowel a Horizontal Pattern

After spreading the mortar mix evenly, use a trowel to create horizontal grooves across the entire surface. To ensure the grooves are straight, use a guide—a straight edge or level—to help keep the trowel aligned.
Since only 0.5 inches of mortar was applied, it dried much quicker than anticipated, which can make troweling more challenging. Work swiftly, and if the mortar is still very soft while creating the grooves, avoid pressing too hard to prevent cutting through the mortar down to the cement board.
Once dry, use a small wire brush to remove any excess mortar and then take off the temporary frame to replace with an actual frame if you choose to have that look.
Step 5: Water Basin

When choosing a water basin, you have two options: you can either make one (which is what I did) or purchase a pre-made one. I opted to build my own because it needed to fit a specific size in the wall of my pergola. If size isn’t a concern, buying a basin is typically the quickest and easiest choice.
For my basin, I used Azek plastic wood, assembling it into a box with screws. To prevent any water from leaking out, I applied silicone to the edges on the interior. I also spray-painted the outside black to match the design. If you want to enhance waterproofing further, you can add flex tape or flex seal to the interior of the basin.
Step 6: Install the Water Feature

When installing the water wall section of the water feature, having supports underneath can make the process easier, especially if you’re working solo. Use clamps to create a temporary stable base for the water feature so it’s supported while you screw it in from the back. I used 4" screws to secure it to the supporting beams, and make sure to use at least five screws on each side for added stability.
Next, I placed the water spillway on top, connecting it with a 1/2" tube that will eventually lead to the water pump that will be located in the water basin. It may sound complex, but it's actually quite straightforward.
Step 7: Install Water Basin

The water basin should be positioned just below the water wall, resting on two small supports that are screwed into the side beams. Since this is a floating water feature, there’s no need to attach the basin directly to the water wall.
Next, place the water pump in the basin and connect it to the top spillway using a 1/2" tube. Fill the basin with water, making sure it is just below the bottom of the water wall.
Finally, plug it in and enjoy the ambiance of your new water feature!


Final Thougts: DIY Water Feature
This is definitely a project that will add ambiance and that "wow" factor to your backyard. My number one suggestion is to take your time and take it step-by-step.
If you feel like you may struggle with the mortar portion of this project, there are alternatives that could be used instead. I personally looked into using a grooved tile, but using mortar is definitely the more cost effective option.
There are also many peel-and-stick options available for grooved tile, which can be a great alternative if you are not comfortable working with mortar. Just be sure that any tile you use is suitable for outdoor use.
If you have any questions along the way about building your own water feature, feel free to message me @cisekdesigns

Comments