Build Your Own Dining Table + Bench: A Step-By-Step Guide
- Mark Cisek
- Nov 1, 2024
- 5 min read
Updated: Jan 19
Overview:
When searching for the right dining set for your space, you’ll find options ranging anywhere from $500 to $5,000, depending on the retailer and materials used. Solid wood sets typically fall toward the higher end, while sets made from manufactured wood are often more budget-friendly. Sometimes, though, you want something truly unique that fits perfectly in your home, and the best way to achieve that is by building it yourself. Here, I’ll walk you through how I built a custom dining table to perfectly fit my space.

Materials:
Matching Chair Ideas
Matching Centerpiece Ideas
2. Rectangular Whitewashed Tray
Building Your Dining Table Set:
Before starting your table build, take time to create a plan and measurements that match your space. The dining table featured here is tailored to fit a smaller dining room, yet it comfortably seats six adults.
Keep in mind that the type of wood used in this example isn’t mandatory—you can choose from various options that suit your budget. I opted for poplar, which is on the higher end, but alternatives that include pine, cedar, oak, or mahogany could work just as well. You can also find a range of stains to customize the color to your liking; for this build, I used a natural wood-aging method. Now, let’s dive into the details of this project.
Step 1: Prepare The Materials (Optional)

Choosing the color and texture for your project is essential and should be planned out before you begin the build. Personally, I skip traditional stains and instead use a natural wood-aging solution made from vinegar, water, and steel wool.
I apply this solution to the wood, then let it sit in the sun to develop a naturally aged look. The more coats you apply and the longer it sits in the sun, the darker the wood becomes. Once dry, you can sand the wood to lighten it to your preferred shade and achieve the exact look you're aiming for.
When using a traditional stain, you can wait until the end of the build to finish the wood.
Step 2: Build Your Table Top

For my tabletop, I chose a 2-inch thick poplar board, which is on the pricier side. The dimensions of the tabletop are 65 5/8 inches long by 40 inches wide, and I decided to use a picture frame pattern for the design.
In the picture frame pattern, the four boards on the outside are cut at 45-degree angles to frame the six boards in the center. The two outer boards running the table’s length measure 65 5/8 inches long and 5 inches wide, while the two boards running the table’s width are 40 inches long and 5 inches wide. The six interior boards measure at 57 3/4 inches in length by 5 inches in width.
Start by gluing and clamping the six interior boards together, allowing them to dry for at least 24 hours. Once dry, glue the outer picture frame boards to these interior boards. For added stability, secure the boards together from the underside using the "toenail" method, placing at least six screws per board.


Step 3: Add Table Legs

Although I designed my own table legs measuring 4.5 inches by 4.5 inches, the measurements provided here will use standard table legs available for purchase, which are typically 3.5 inches by 3.5 inches.
On the underside of your tabletop, measure and mark 1.5 inches from each side near the corners. This will serve as a guide for positioning your 29-inch table legs. Once glued in place, this spacing creates a 1.5-inch overhang on all sides of the table.

Step 4: Add Apron and Frame

For the apron, I used a 1-inch thick poplar board cut to a 4-inch width. The apron along the length of the table between the legs measured 55 3/4 inches, while the apron along the width measured 29 3/4 inches. I attached the apron to the underside of the tabletop using both glue and screws for added support. When positioning the apron, you can either set it back by 1/4 inch or align it flush with the legs, depending on your preference.
Next, I added four cross beams between the apron that were 34 inches in length, spaced 16 inches apart, with two beams placed directly against the table legs. After gluing and screwing the cross beams in place, I secured the two beams adjacent to the legs by screwing them directly into the legs for additional support using 3 inch screws.

Keep in mind that some measurements may vary slightly due to wood quality or minor adjustments in previous steps. Always double-check your measurements before cutting to ensure each piece will fit correctly in its designated area.

Step 5: Protecting Your Dining Table
After putting in all the hard work to build your own dining table, protect your investment by sealing it properly. Personally, I prefer a water-based matte polyurethane. Though it appears shiny when first applied, it dries to a natural matte finish.
Using a roller, I applied five coats of Varathane Water-Based Ultimate Polyurethane. To keep my table looking brand new, I plan to reapply a fresh coat every two years.
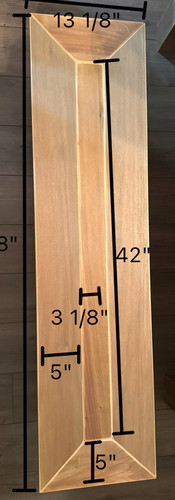
Step 6: Building a Matching Bench
The matching bench will be built in the same exact way as the table, but as a smaller version. For the top of the bench, you will glue five boards in total, using the same picture frame pattern, but using 1" poplar instead of 2" that was used for the table. First, glue and clamp the three long boards together, then finish off the picture frame by adding the two end boards.
Next, you will glue the legs on from underneath. You will use the same legs that were used for the table, but this time, they will be 16 3/4 inches in length. The legs will be recessed 3/4 inch from the corner edges..
Next, add the apron between the legs and the cross joists underneath for support. Do not cut the apron until you've measured between the legs after glued, as there is always a chance the measurement could be slightly off. After gluing, you can also add screws for extra support, while also screwing the end joists to the legs. The measurements for the apron are shown in the pictures below.


Final Thoughts:
Remember, this guide is just one approach to building a dining table—everyone has their own unique style. There are countless options for wood types, sizes, and stain colors, allowing you to personalize this project and add your own unique touch to the build.
I hope this serves as inspiration to build your own dining set and create a unique style that perfectly complements your space.

Comments